In this article, we will learn to invoke a lambda function using an AWS Simple Storage Service(S3) event notification trigger.
To follow along this article, you need to have an AWS account and some knowledge about the Python programming language.
You should also have a basic understanding of AWS Lambda and how it works. Check out this visual guide on 100 days of data.
You don't have to reinvent the wheel, unless it is for an educational purpose! AWS Lambda comes with s3-get-object-python blueprint lambda function that already has the sample code and function configuration presets for a certain runtime.
Note - This blueprint's permission are set to allow you to get objects from the S3 bucket. It doesn't let you write to the S3 bucket.
Step 1 - Create an S3 bucket
- Open the Amazon S3 console and choose
Create bucket. - Enter a unique and a descriptive name for your bucket. For example -
nse50, a bucket to store the top 50 performing stocks from National Stock Exchange. - Next, you have to choose an AWS region. Note - Your Lambda function should be created in the same Region.
- Choose
Create bucket.
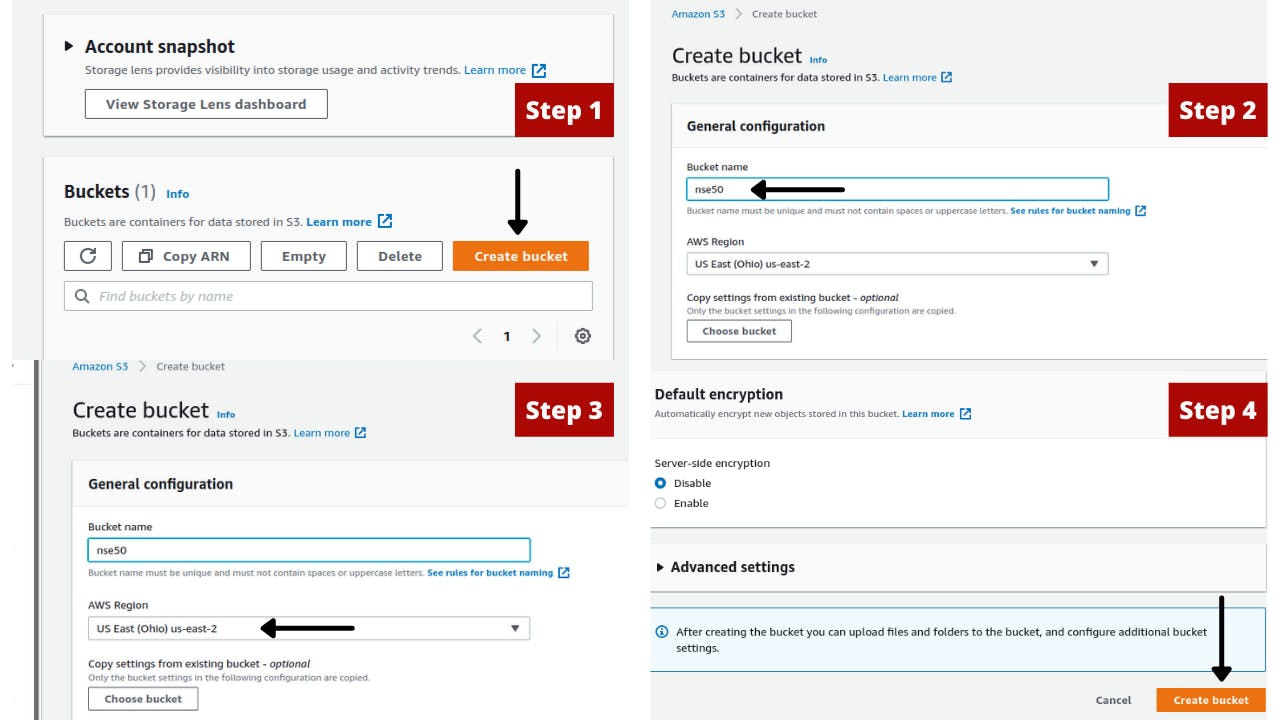
After creating the bucket, Amazon S3 opens the Buckets page, which displays a list of all buckets in your account in the current Region.
To upload a test object using the Amazon S3 console
- On the Buckets page of the Amazon S3 console, choose the name of the bucket that you created.
- On the Objects tab, choose
Upload. - Drag a test file from your local machine to the Upload page.
- Choose
Upload.
Step 2 - Create a Lambda function
To create a Lambda function from a blueprint in the console
- Go to the Lambda Functions page and Choose
Create function. - On the Create function page, choose
Use a blueprint. - Choose
s3-get-object-pythonfor a Python function ors3-get-objectfor a Node.js function. Choose Configure. - Enter a function name of your choice. For example -
s3_audit_function. - For Execution role, choose
Create a new role from AWS policy templatesand enter a role name of your choice. For example -s3_audit_role. Under S3 trigger, choose the S3 bucket that you created previously.
When you configure an S3 trigger using the Lambda console, the console modifies your function's resource-based policy to allow Amazon S3 to invoke the function.
Choose Create function.
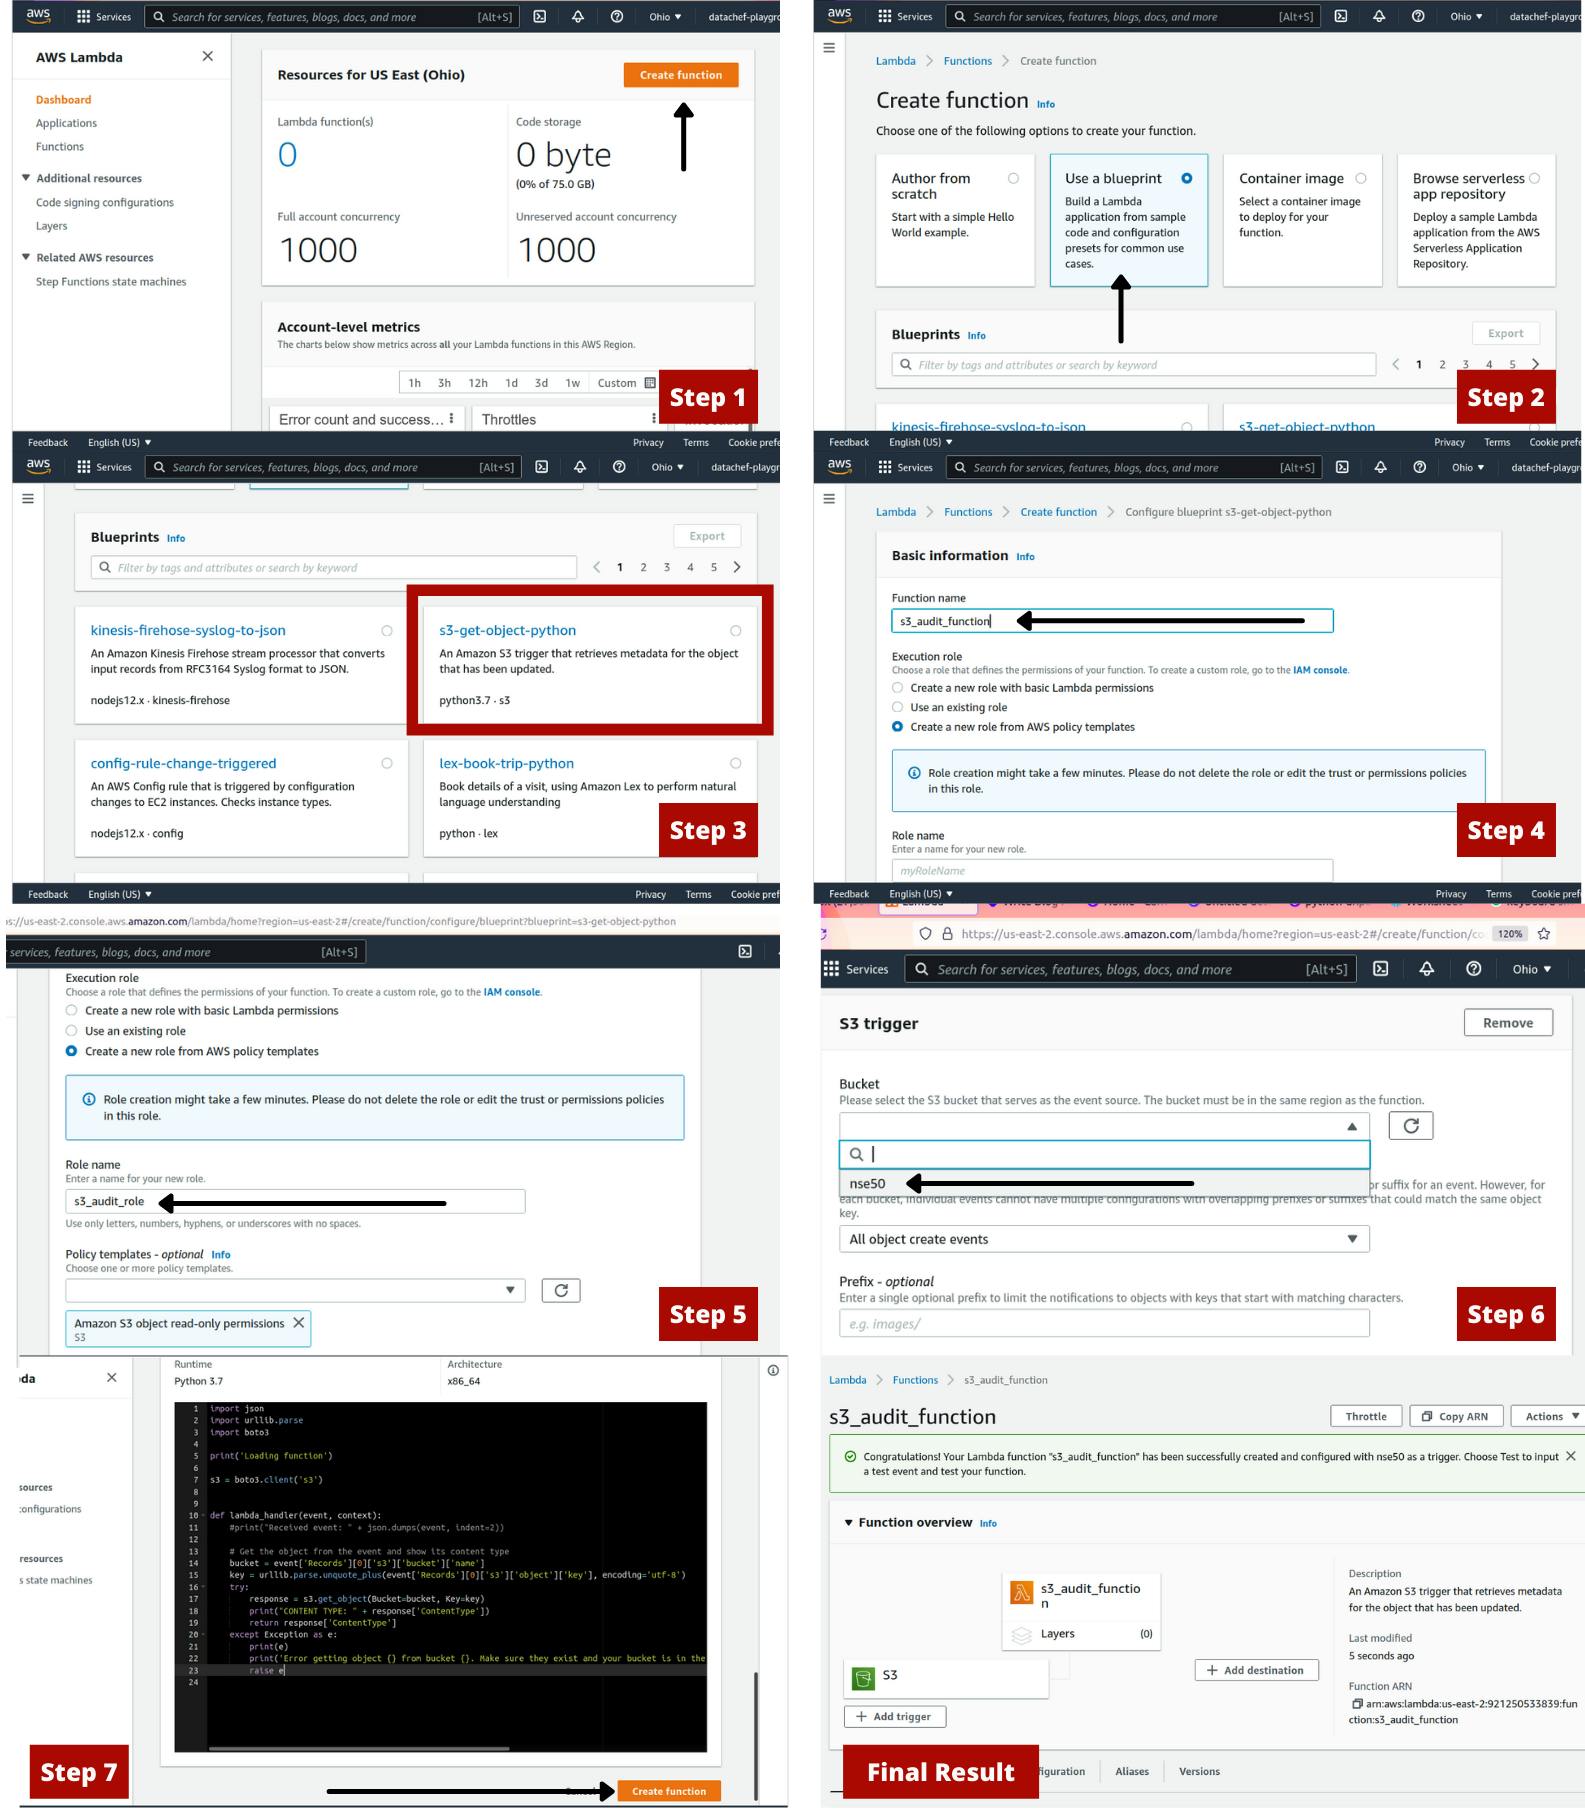 Open the above image in new tab for better viewing experience.
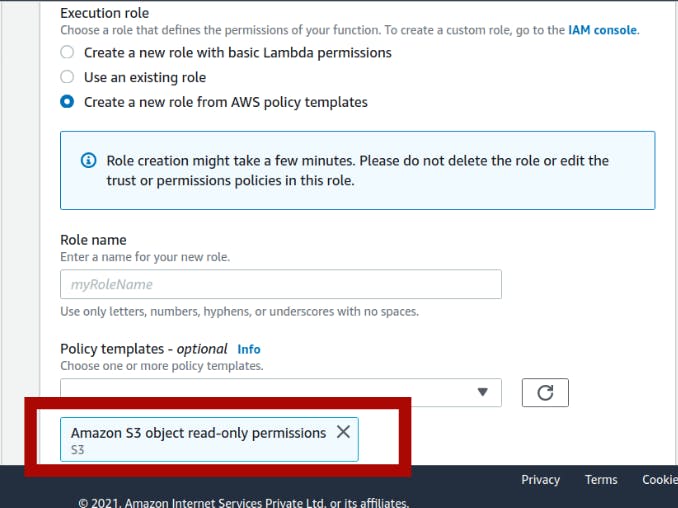
Pay attention to Step 5 of the above image. This shows that this lambda function has only read-only permissions. So you can read from S3, but you can not write to it.
Step 3 - Testing the function
As mentioned earlier, this blueprint comes with its own sample code.
Before putting your code into production, you need to test your code. AWS Lambda lets you configure different types of test event from different services to help you in testing your code.
On the Code tab, under Code source, choose the drop down arrow next to Test, and then choose
Configure test eventsfrom the dropdown list.In the Configure test event window, do the following:
- Choose
Create new test event. - From Event template, choose
Amazon S3 Put (s3-put). This is similar to the event triggered in S3 when you upload a file. - For Event name, enter a name for the test event.
- In the test event JSON, replace the S3 bucket name and object key with your bucket name and test file name. Your test event should look similar to the following:
{ "Records": [ { "eventVersion": "2.0", "eventSource": "aws:s3", "awsRegion": "us-west-2", "eventTime": "1970-01-01T00:00:00.000Z", "eventName": "ObjectCreated:Put", "userIdentity": { "principalId": "EXAMPLE" }, "requestParameters": { "sourceIPAddress": "127.0.0.1" }, "responseElements": { "x-amz-request-id": "EXAMPLE123456789", "x-amz-id-2": "EXAMPLE123/5678abcdefghijklambdaisawesome/mnopqrstuvwxyzABCDEFGH" }, "s3": { "s3SchemaVersion": "1.0", "configurationId": "testConfigRule", "bucket": { "name": "nse50", # Replace your bucket name "ownerIdentity": { "principalId": "EXAMPLE" }, "arn": "arn:aws:s3:::example-bucket" }, "object": { "key": "HappyFace.jpg",# Replace the name of file "size": 1024, "eTag": "0123456789abcdef0123456789abcdef", "sequencer": "0A1B2C3D4E5F678901" } } } ] }- Choose
Create.
- Choose
To invoke the function with your test event, under Code source, choose
Test. The Execution results tab displays the response, function logs, and request ID, similar to the following:
Test Event Name
put-event

Response
"image/jpeg"

Function Logs
START RequestId: ca820e7b-0e24-465a-97be-edce7f43ace2 Version: $LATEST
CONTENT TYPE: image/jpeg
END RequestId: ca820e7b-0e24-465a-97be-edce7f43ace2
REPORT RequestId: ca820e7b-0e24-465a-97be-edce7f43ace2    Duration: 141.62 ms    Billed Duration: 142 ms    Memory Size: 128 MB    Max Memory Used: 74 MB

Request ID
ca820e7b-0e24-465a-97be-edce7f43ace2
Final result
Now, your lambda function will be invoked every time you upload a new file to your bucket.
On the Buckets page of the Amazon S3 console, choose the name of the source bucket that you created earlier.
On the Upload page, upload any file of your choice to the bucket.
Open the Functions page on the Lambda console.
Choose the name of your function (my-s3-function).
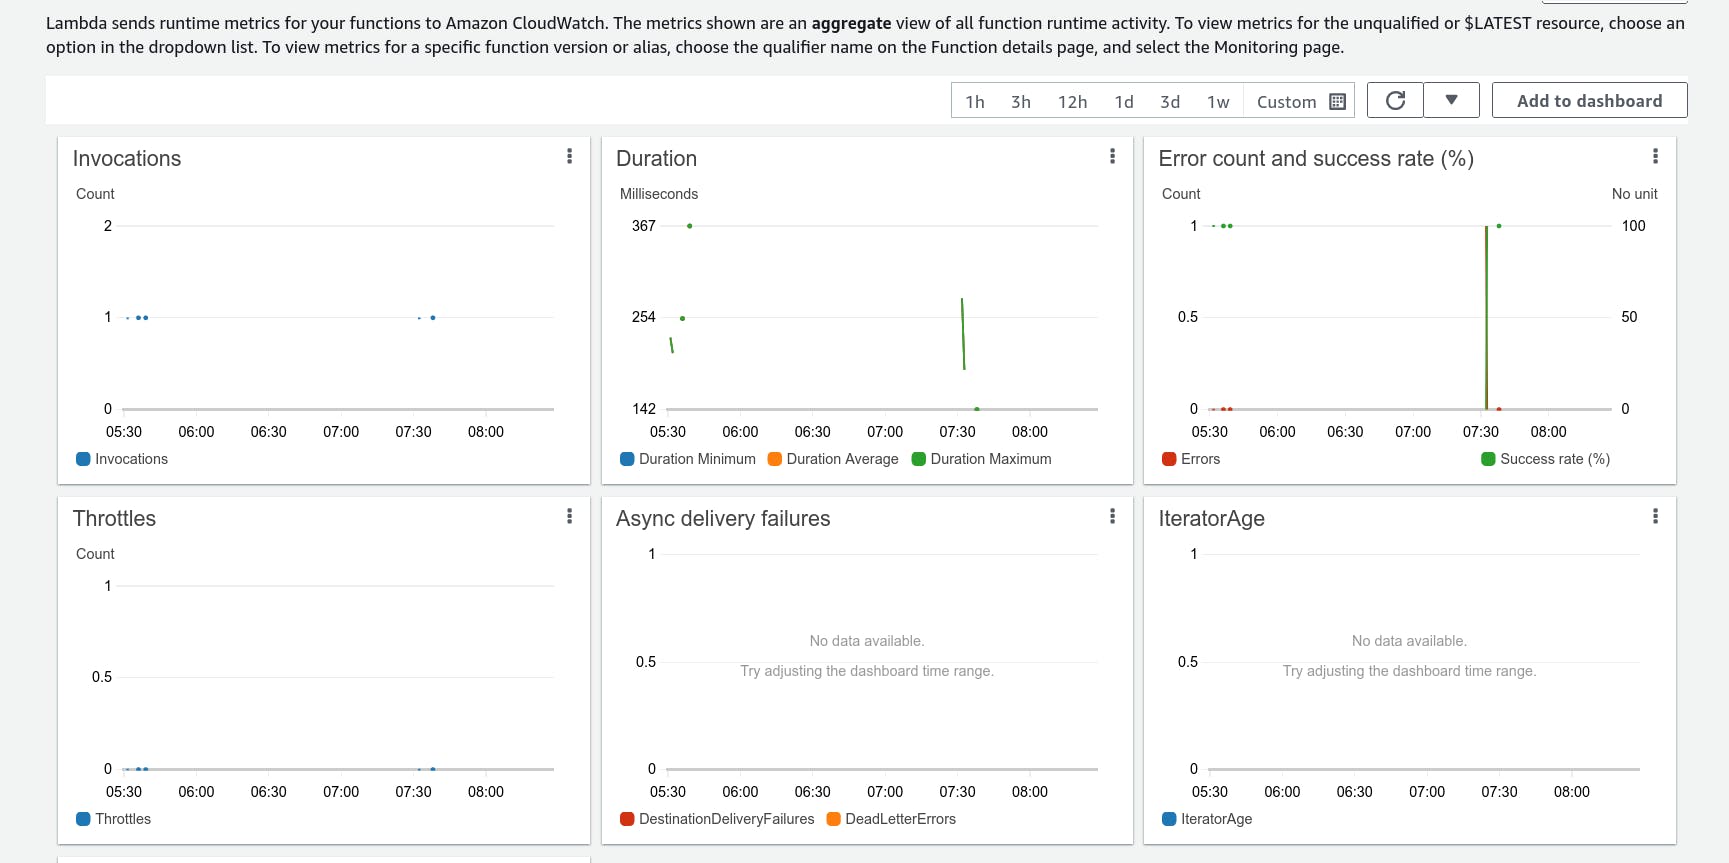
To verify that the function ran once for each file that you uploaded, choose the Monitor tab. This page shows graphs for the metrics that Lambda sends to AWS CloudWatch. The count in the Invocations graph should match the number of files that you uploaded to the Amazon S3 bucket.
